

How To Create A Felt Board
Updated date:
How to Make a Flannel Board Calendar
I'm a mom of two who loves to share craft ideas and educational opportunities for kids!
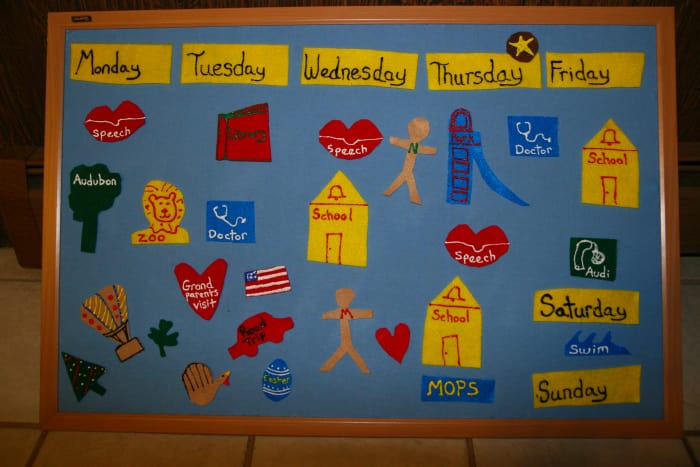
Flannel board calendar
Flannel Boards Have Many Uses
Flannel boards (or storyboards) are very simple visual enhancements to stories. Many people remember these simple boards from preschool or Sunday School when a teacher used felt cut-outs to retell a story. Nearly all flannel boards are made from a flannel backing, and use felt pictures—the felt naturally sticks to the flannel and can be repositioned, removed, and replaced indefinitely.
Using a flannel board during a story helps a child to:
- Predict what might come next in a story.
- Understand numbers and counting.
- Develop sequencing concepts.
- Match similar objects.
- Develop short-term recall of a basic story plot.
- Learn the categorization of objects.
- Develop fine motor skills.
- Understand complicated concepts such as weather and time.
A flannel board can also be turned into a calendar. It is very simple and inexpensive to make a storyboard, and the felt pieces can be customized to reflect the activities of individual families. Using a flannel board as a calendar helps children to develop the concepts of "yesterday," "today," and "tomorrow." Longer time concepts such as "week" or "month" can be incorporated as children grow older.
A simple flannel board may be constructed from a framed cork bulletin board and a piece of flannel. The best thing about this project is that no sewing or gluing is required!
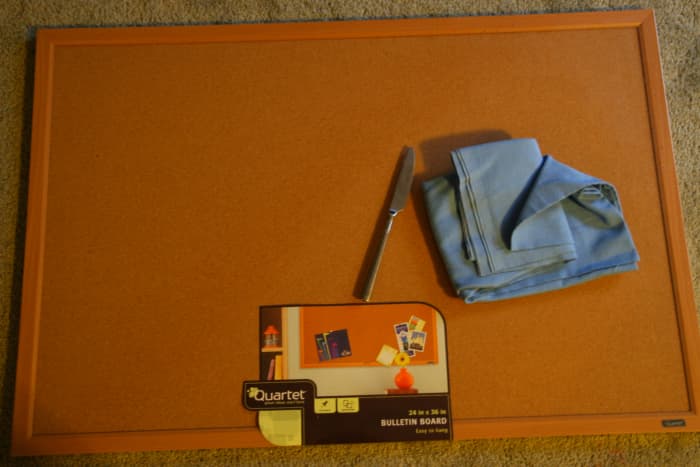
Flannel, a framed bulletin board, and a butter knife are the only materials required to create a flannel storyboard.
Leah Lefler, 2009
Read More From Feltmagnet
Flannel Board Materials
- Flannel
- Bulletin Board
- Butter Knife
Make a Flannel Board for Less Than $15
- Purchase an inexpensive cork bulletin board with a frame. These are easily found at Walmart, Target, or other discount retailers. A large bulletin board will create a big landscape for your flannel board, and small boards are great for travel-size flannel boards.
- Purchase enough flannel to cover the surface area of the bulletin board, with a one-inch overlap.
- Lay the flannel on top of the bulletin board, and use a butter knife to gently push the excess flannel under the frame. Work slowly around the board in a clockwise direction, smoothing out wrinkles along the way.
- Trim any extra flannel edges that stick out from under the frame.
- Purchase felt sheets, which can be obtained from stores like Walmart, JoAnne Fabrics, or Michaels. Cut the sheets into shapes or into objects. Puffy paint may be used to add features to felt animals or people.
- The felt shapes will adhere to the flannel board and are easily moved or rearranged. Flannel boards are useful as visual aids to children's storybooks, as calendars for preschoolers, or as a way for children to create detailed scenes and stories of their own.
Buy Feltboard Pieces Online
How to Make Felt Shapes for Storyboards
There are many options for creating the felt calendar icons (or other storyboard characters).
- The most simple method is to use felt sheets and three-dimensional fabric paint. Felt sheets can be purchased for less than a dollar, and the puffy paint can be found at a local Target, Walmart, or craft store.
- More detailed felt pieces can be made by using a material called pelon. Pelon is transparent, white interfacing that can be found in sewing or craft stores. Pelon is transparent, so drawings can be traced onto the material with a permanent marker. The piece can then be cut out, and colored with crayons or colored pencils. The best thing about using pelon is that children can help color the pictures!
- Clipart (or other images) can be printed onto cardstock. Color the picture (if necessary) and then laminate the image. If a professional laminating machine is not available, simply use clear contact paper to cover both sides of the picture. Use white glue, tacky glue, or a hot glue gun to attach a piece of felt to the back of the laminated picture. The only negative to using cardstock is that the pictures will eventually develop creases and will tear or peel apart over time.
- Obtain transfer paper (used for placing images on T-shirts) and print out an image onto the paper. Simply iron the image onto a piece of felt—light colors of felt work best for this project. Cut out around the shape on the felt, and the result is a professional-looking felt cut-out. If a color printer is used, the felt pieces will look even better! If black-and-white clip-art is used, the finished felt pictures can be colored in with fabric markers.
Make a Portable Flannel Board for the Car
Young children love playing with flannel boards because they can create their own scenes. A flannel board can be created for the car by purchasing a small corkboard—there are many types sold inexpensively at office supply stores. Simply make sure the corkboard has a frame around it, and tuck the flannel under the frame with the same technique used for the larger bulletin board project. Felt pieces can be carried in a Ziplock baggie for use in the car.
Another option for a travel-sized flannel board is to use tacky glue to cover one side of a clipboard with flannel. Carefully cut the flannel out around the clip on the clipboard, and line up the edges of the flannel. A bag containing the felt pieces can be held in place by the clip on the clipboard when the miniature flannel board is not in use.
Flannel Board Story Idea
Related Articles
How To Create A Felt Board
Source: https://feltmagnet.com/crafts/Make-an-Inexpensive-Flannel-Board
Posted by: griffithatted1945.blogspot.com
0 Response to "How To Create A Felt Board"
Post a Comment